

How to Make an AI Voice-Over for Videos for Free
This year, I started the Kinmen Podcast about Kinmen Island and finally managed to create content in German. However, I also added English and Chinese voice-overs using a free AI voice-over generator. The results were surprisingly good. So I decided to share how you can do the same.
In this guide, I will show you how to create AI voice-overs for free. I use an AI voice-over generator, but it does take a few more steps to turn a video multilingual.
My podcast is hosted on YouTube, and I use DaVinci Resolve as my editing software. However, this tutorial also works with other podcast platforms and editing tools. The text-to-speech solution I will cover here is completely free as well. And of course, you can use a human speaker for the voice-over, if you wish.
Preparation: How to generate an AI Voice-Over for free
In this guide, you will turn your original audio into a text file and translate it. You will then create a voice-over using a free AI tool. You will also see how to adjust the AI-generated voice, add it to your video, and use it on YouTube.
Before you start, make sure your video is already edited and ready for publication. The audio should be clear and free of background music. Ideally, you should separate the voice from other sounds, such as effects or music. Any voice-over maker will have issues with noise.
In my case, I work in DaVinci Resolve with three separate audio tracks:
- One for the voice
- One for sound effects
- And one for background music
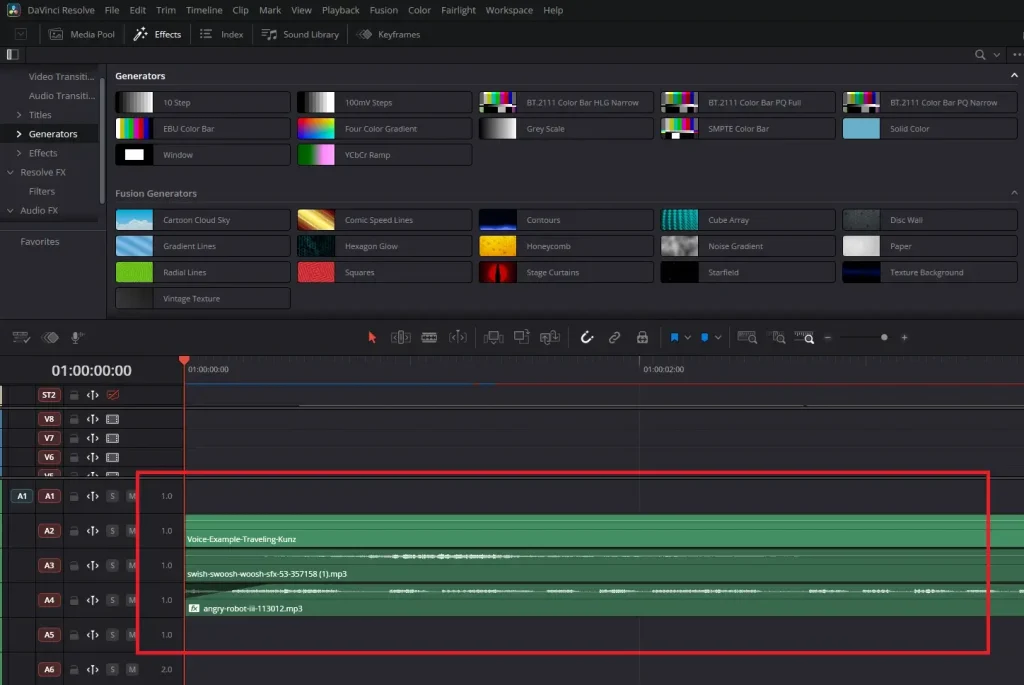
Of course, you can use any other editing software. What matters is that you have a clean audio file of the voice you want to use for your voice-over generator. And you need an editing software that supports multiple audio tracks.
Step 1: Create Text for Your AI Voice Over (Text-to-Speech)
First, you need to create subtitles for your video and export them. I used DaVinci Resolve for this. Simply select your voice audio track, then go to: Timeline → AI Tools → Create Subtitles from Audio.
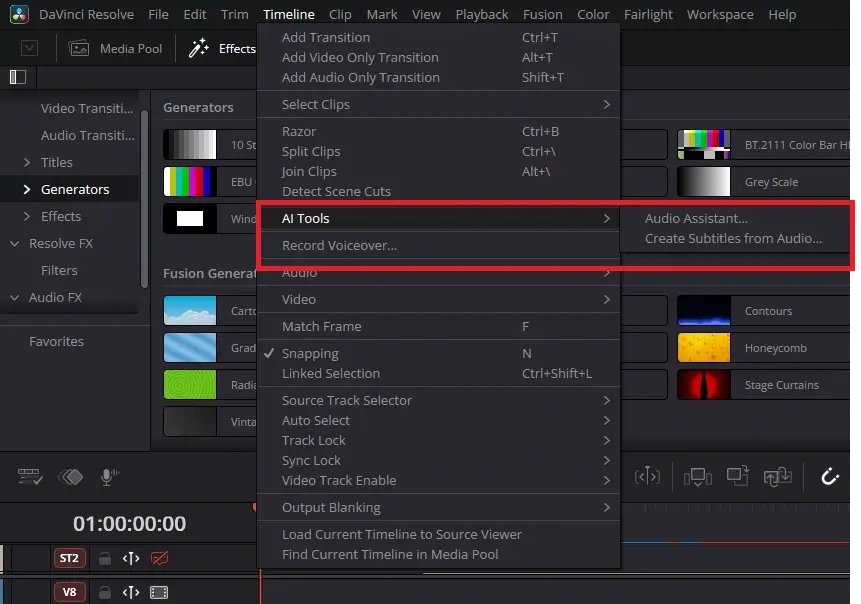
Leave all the default settings as they are and click “Create.” DaVinci Resolve will automatically generate subtitles, which should appear on top of your timeline.
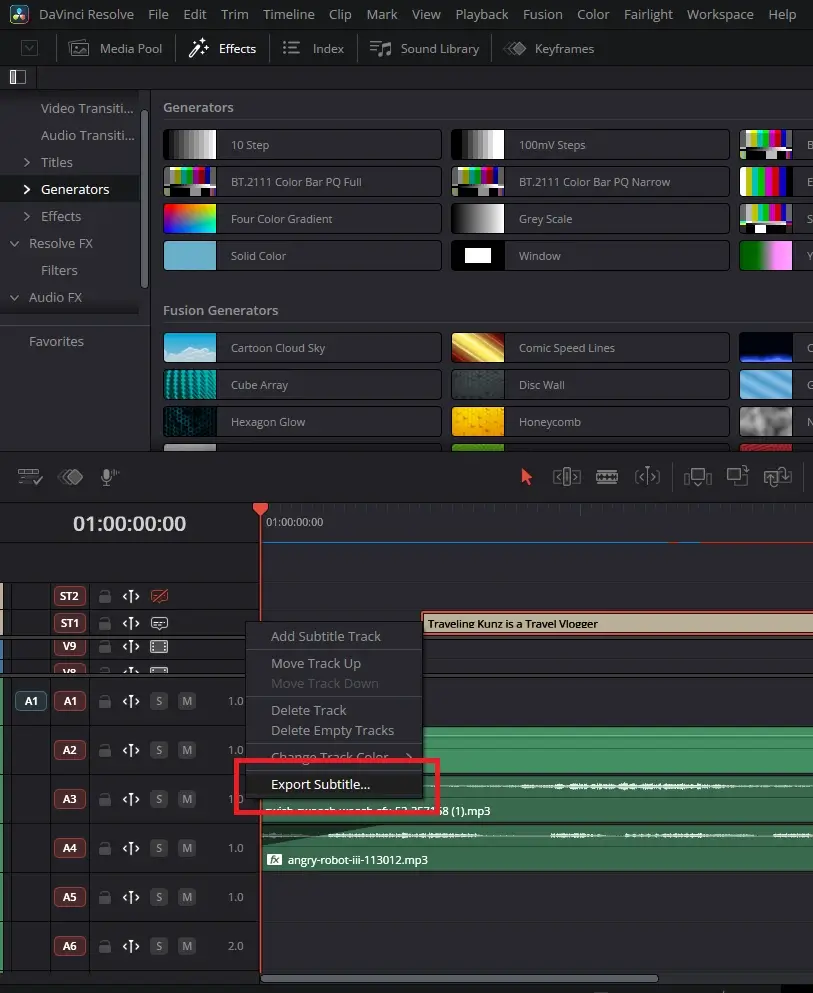
Once the subtitles are ready, select the subtitle track and choose “Export Subtitles.” Use the default .srt format and save the file.
Alternative Way: Create Text for AI Voice-Over With a Free Tool
The subtitle generation in DaVinci Resolve is likely a DaVinci Resolve Studio (paid) feature. But since this guide promised free AI voice-over tools, there is a simple workaround: Create the subtitles with YouTube.
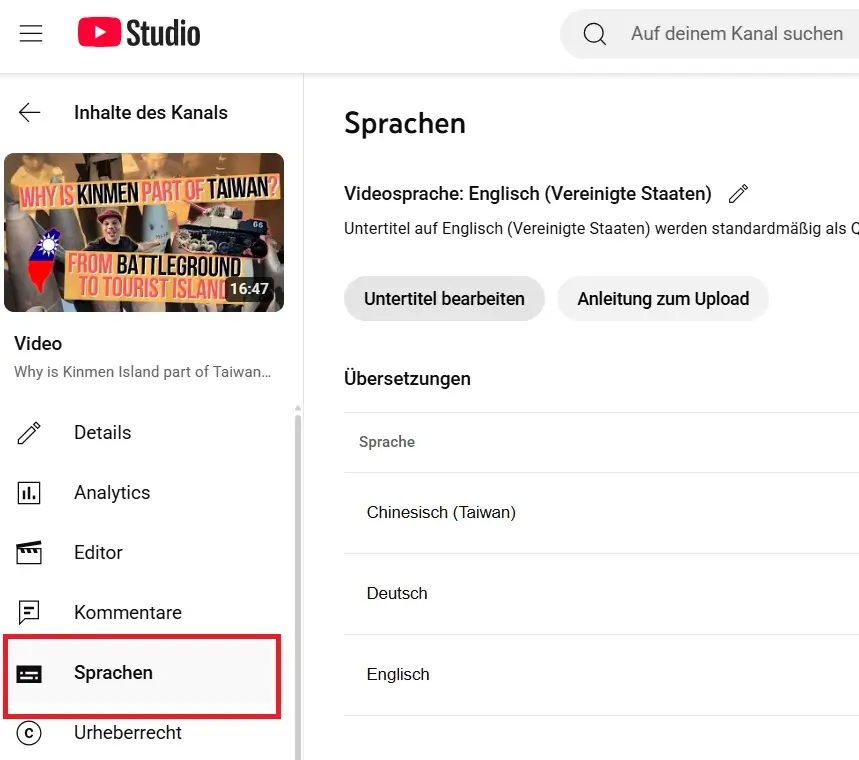
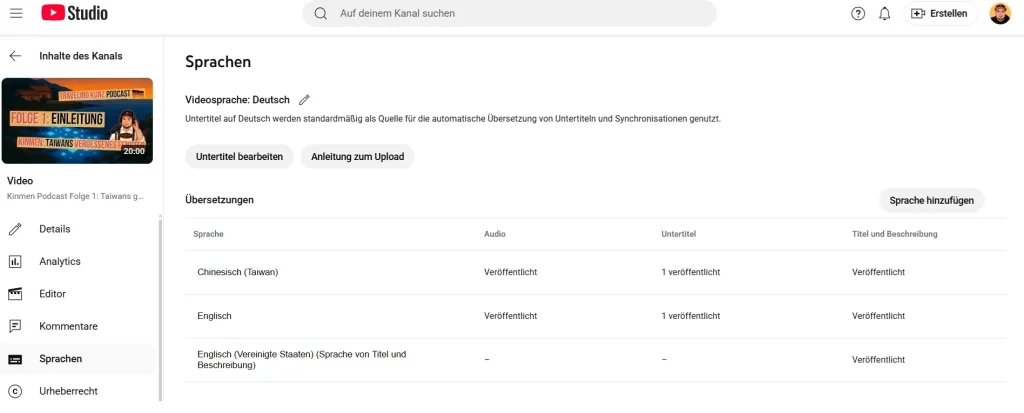
Upload your video to YouTube, set the visibility to Private. YouTube will automatically generate subtitles. Go to YouTube Studio → Languages (in my case it is “Sprachen,” since my interface is in German). From there, you can download the subtitles either as plain text or as an .srt file with timestamps. I recommend downloading the .srt file, and you will see why in a moment.
Prepare Your Subtitles for AI Voice-Over Creation
Before you can turn your text into speech with an AI voice generator, you will need to prepare your subtitle file. Make a copy of the original .srt file and open the copy. Keep the original .srt-text, it will help you later.
Start by proofreading the subtitles. YouTube’s automatic captions often contain errors. In my experience, DaVinci Resolve does a better job converting speech to text, but even then, minor mistakes can occur. In any case, you can ask ChatGPT to “proofread these subtitles” in your chosen language. But again, an AI is proofreading another AI. So, if you have the option, correct the text yourself.
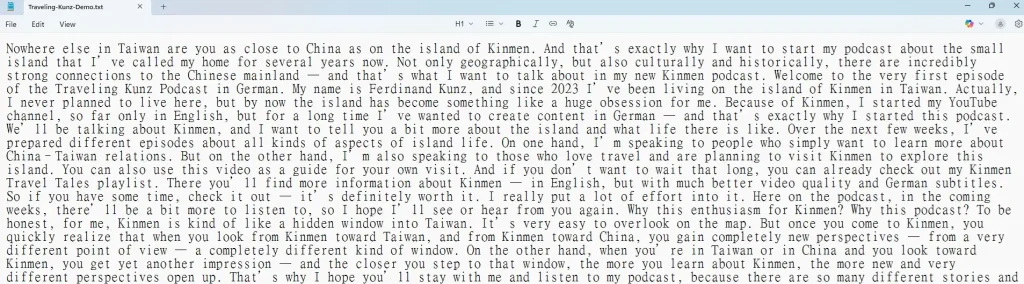
Next, remove the timestamps and divide the text into segments, one for each scene. To remove timestamps, you can use the free online tool at anatolt.ru. Just follow the link, paste your .srt text, and click “Do the job!”. You willl get clean text without timestamps.
Segment Your Text for the Best AI Voice Over
Then, remove all formatting and line breaks. A quick hack: paste the text into your browser’s address bar. It will automatically strip out line breaks. Copy the clean text back into a text file. (If it is stupid but it works, it ain’t stupid!)
Now you have your text file. But do not want to upload it all at once to your AI voice-over tool. Most free tools have character limits, and large text blocks do not match the natural pacing of your video.
Instead, watch your footage and look for natural breaks or scene transitions. This is where your .srt file with timestamps comes in handy. For example, in my podcast videos, each new chapter starts with a short jingle, and I want to include those transitions in my AI voice-over as well.

Divide your text into smaller segments that align with these scene changes. Add a few page breaks or separators between sections. This will make it much easier to generate and manage your AI voice-over later.
Step 2: Translate Your Text into the Target Language for Your AI Voice Over
Now it is time to translate your text into the target language of your choice. You can do this manually, or by using Google Translate or another translation tool. I personally used ChatGPT with a simple prompt. To do so, just tell your AI tool to “translate the script for my voice-over.”
Copy & Paste your text to ChatGPT. I suggest translating scene by scene so you do not overwhelm the AI tool. I also experimented with more sophisticated AI prompts. For example, German is a fairly wordy language, while the AI voice-over in Chinese usually takes less time to say the same thing. That means the spoken output text is shorter. I tried making the script more detailed to match the timing, but the AI simply made it wordier.
In the end, I stuck with a simple translation and later adjusted the pace of the generated AI voice-over to match the desired length. Even when using a simple prompt, make sure to review the AI-generated script for possible AI hallucinations, it does happen.
Step 3: Use an AI Voice Over Generator
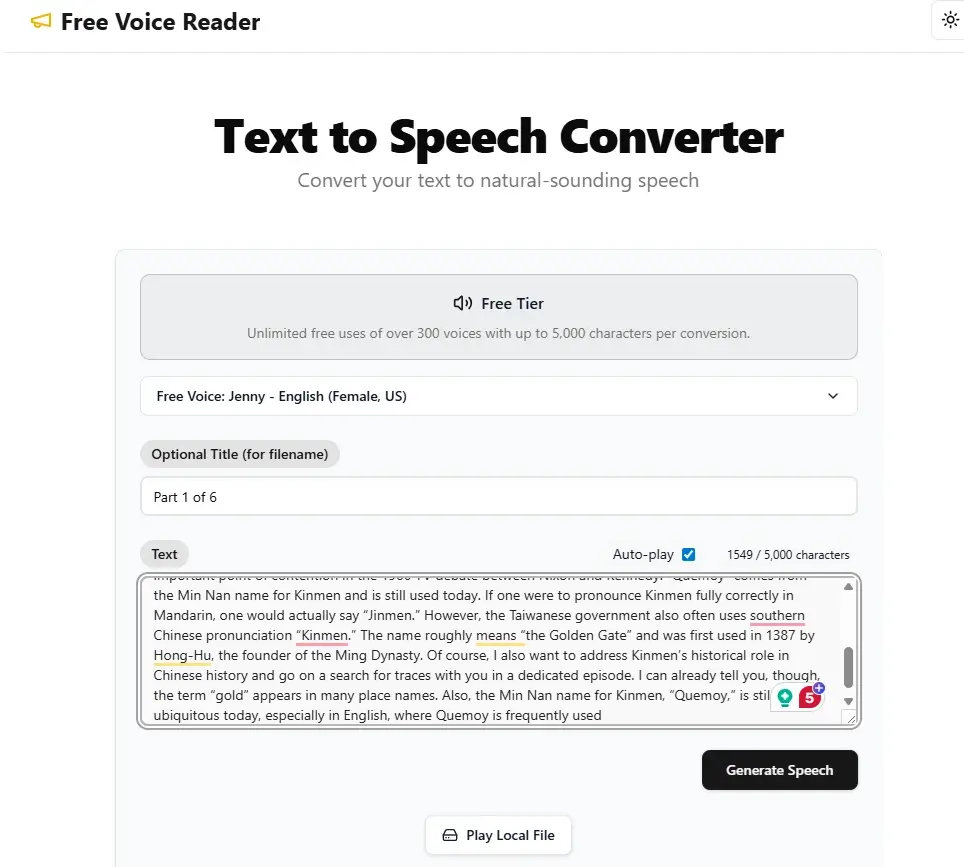
For this step, I used Free Voice Reader, a free AI voice-over tool with a 5,000-character limit. It might not be the most advanced AI voice-over software, but it gets the job done. Also, you do not need to create an account. If you search online for “free AI voice-over generator,” this tool is a great place to start.
How to Create the AI Voice Over
- Copy and paste the text for each scene into the tool.
- Select an AI voice model of your choice.
- Paste the text for each scene into the AI voice.
- Generate the voice-over using the text-to-speech function.
- Download the audio file.
- Repeat the process for all your text segments.
Make sure to note which voice model you used so you can stay consistent throughout all of your videos. I did not make any adjustments to the voice speed at this stage. I prefer to do that later in DaVinci Resolve (see below). However, you can fine-tune speed directly in the AI tool if you prefer.
Of course, you are free to use any other AI voice-over generator. There are several good options available, depending on your language and style preferences. I have to mention that the AI voice reader sometimes misses words. Very rarely, but it did happen to me. So listen to all outputs and check the content. If there is a mistake, just reload the page and generate the voice-over again.
Step 3: Merge the AI Voice Over with Your Video
By now, you should have several audio files containing your free AI voice-overs. The next step is to merge them with your video. I use DaVinci Resolve again for this step. The free version works perfectly fine. However, you can use any editing program that supports multiple audio tracks.
How to Add the AI Voice Over
- Add a new audio track above or below your original voice track
- Mute your original voice track
- Import the AI voice-over files you created earlier
- Align each AI voice segment with the correct scene in your video
- Adjust the pacing of the AI voice if necessary
For example, I slowed down my English voice-over to 85% of its original speed. In my videos, I embed subtitles in English and Chinese, so the timing of the spoken and written text needs to stay consistent with the original audio. As mentioned, German is a bit wordy, thus, my Taiwanese and English voice-over has to be a bit slower.
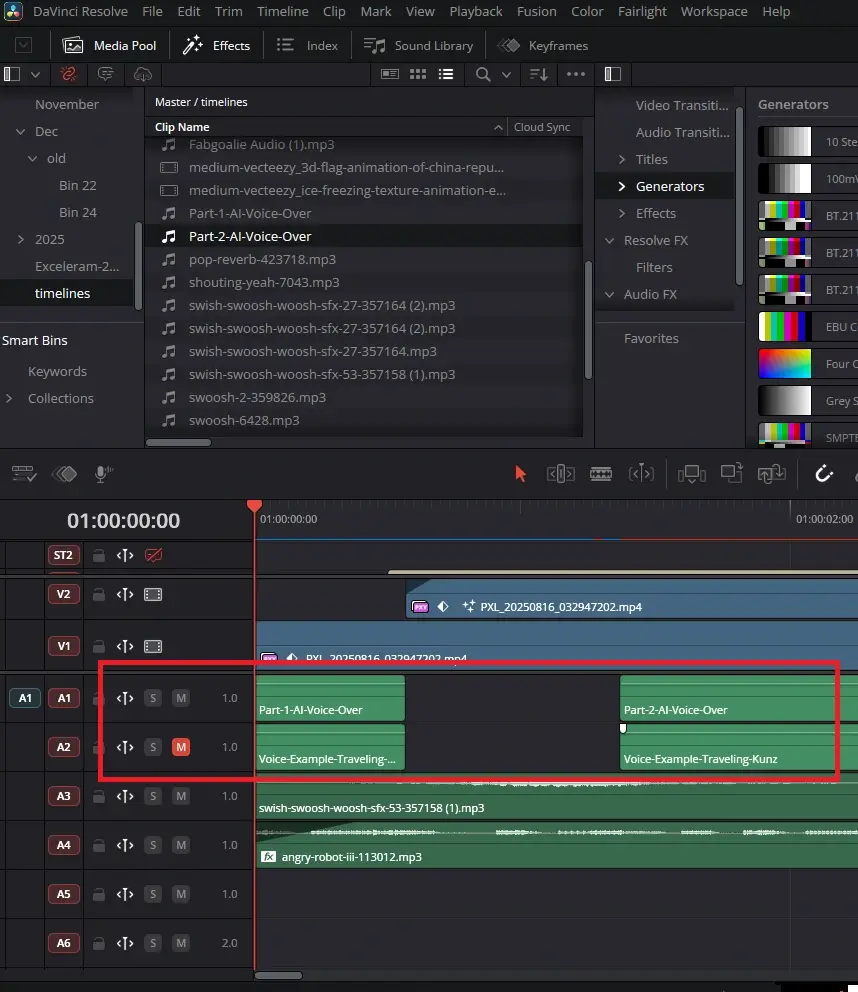
Repeat this process for all your scenes. This ensures that your sound effects, transitions, and pauses all stay in the right place. You can also add audio effects to make your AI voice sound more natural or polished.
Side Note: About Text-to-Speech in DaVinci Resolve
At the time of writing, DaVinci Resolve does not have a built-in text-to-speech feature, at least not yet. There are some third-party AI voice-over plugins available, but I have not tested them.
Originally, I wanted to use DaVinci Resolve’s Voice Training feature to create a model of my own voice. While my generated AI voice sounded a bit different, I did not find it added enough value to justify the extra work. Thus, I decided to stick with the default AI voices.
Step 4: Render or Export the AI Voice-Over Audio File
This step is straightforward. It is time to render your video with the AI voice-over. Just make sure your original voice track is muted before exporting. DaVinci Resolve also lets you export audio only. This is useful if you just want the AI voice-over (with all sound effects) as an MP3 file.
In my workflow, I first rendered the full video with the original audio and uploaded it to YouTube. Later, I added my two AI voice-overs (in English and Chinese) and exported them separately as audio files. To do this, simply toggle the mute button on and off for the corresponding tracks, depending on which voice-over version you want to export.
Once you have exported the different audio versions, you can easily add them to your video on YouTube or any other platform that supports multiple audio tracks.
Summary: How to Make an AI Voice Over for Free
And that is how you create an AI voice-over with just a few simple tools. It might not be the best AI voice-over setup, but I was genuinely impressed by the results. You just need a couple of tools and can create voice-over in any language. Here are two more example podcasts.
My main motivation was the language challenge. My travel vlog is, and will remain, primarily in English. But I also wanted to offer content in German without spending too much time or money.
Using a free AI voice-over tool turned out to be the perfect solution. As an amateur travel vlogger, I do not have the time to manually record and edit multiple voice-overs. This workflow is quick, practical, and matches the subtitles I add to my videos. While it is not lip-synced, it still provides a enjoyable viewing experience.
Feel free to share your feedback! You might also want to check out my blog post on Finding the Best Travel Vlog Camera or visit my YouTube channel.